Clariti Licensing Setup
The following procedures cover the activation of a Poly Clariti License. Note: You must complete all of the following procedures to complete the Licensing setup.
To Activate a Clariti License you will work from the two following pages:
Poly Clariti Core System Web Interface
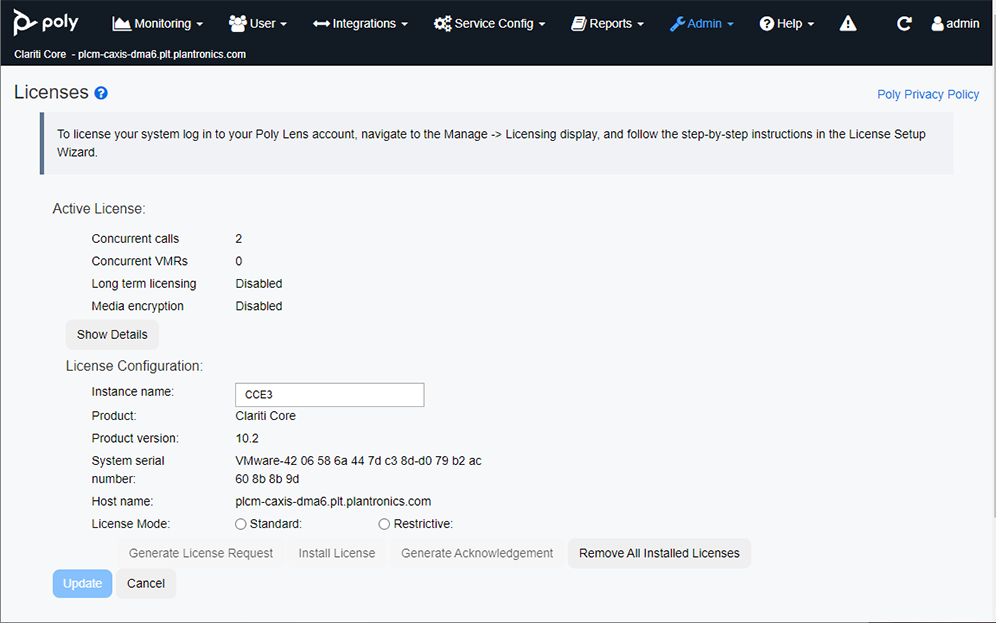
Select Admin > Server > Licenses.
Poly Lens
Select Manage > Licensing > Clariti.
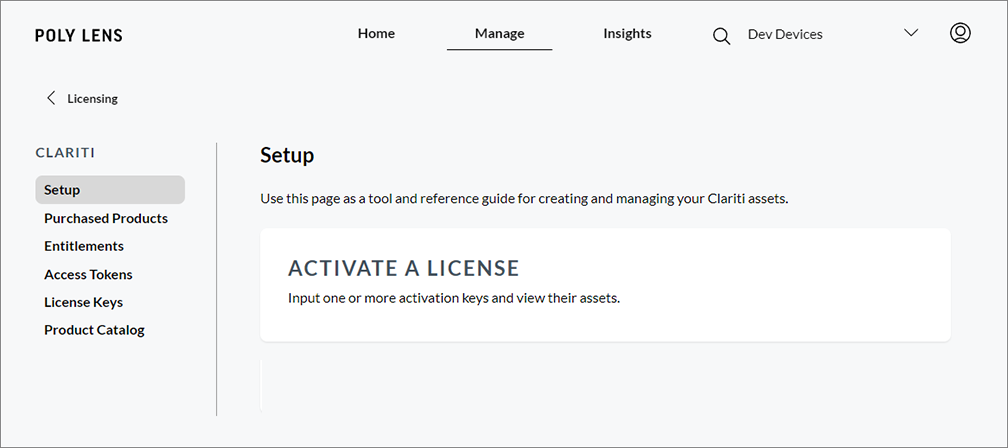
Activate a License
The first step is to Active your Clariti License. After purchasing your license, the License Activation Key will be sent to you via an email. See Activate a License for detailed information.
Link and Entitle your Purchased Product
Next you will link your purchased product to Poly Lens and assign it's Entitlements.
There are three methods to link your product:
Standard Auto
Use this mode if the Poly products have direct internet connectivity. This mode requires the least amount of configuration and enables you to refresh your license only once per year.
- Open the Clariti Core System Web Interface.
- Select Admin > Server > Licenses.
- Enter a License Configuration Name.
- Set the License mode to Standard.
- Select Enable automatic license refresh.
- Enter the Access token from Poly Lens. See Access Tokens below.
- Select Update.
- A message will display Updating/Refreshing license.
- If successful, Last connection status will display SUCCESS.
- Next to manage Entitlements. See Manage your Entitlements below.
Standard Manual
This option generates a unique request from Poly Lens and pastes it into your product page. Note: Additional setup will be necessary. This option should be used in environments whose Poly products do not have direct internet connectivity, but a system is present that allows data to be copied between the network the Poly devices are on, and the internet.
- Open the Clariti Core System Web Interface.
- Select Admin > Server > Licenses.
- Enter a License Configuration Name.
- Set the License mode to Standard.
- Select Generate License Request.
- Use the copy to clipboard icon, to copy the Encoded Request.
- In Poly Lens, select Manage > Licensing > Clariti > Purchased Products.
- Select Add New > Standard Purchased Product.
- Paste the Encoded Request into the field.
- Select Add Standard Purchased Product.
- If successful the License will disply in the list of Purchased Prodcucts.
- Next to manage Entitlements. See Manage your Entitlements below.
Restrictive Manual
This option allows you to manually input all the information about your product and handle all of the linkage to this account yourself. This option should be used in environments whose Poly products are completely isolated from the internet.
- Open the Clariti Core System Web Interface.
- Select Admin > Server > Licenses.
- Enter a License Configuration Name.
- Set the License mode to Restrictive.
- Select Generate License Request.
- Copy all the information of Encoded Request. Note: Copy (by hand, screenshot, etc.) the Request information (Name, Type, Version, SN, Host Name, and Encoded Request).
- In Poly Lens, select Manage > Licensing > Clariti > Purchased Products.
- Select Add New > Restrictive Purchased Product.
- Enter all the information that was copied by hand in the Encoded Request into the corresponding fields. Note: If the infomration is not added exactly as displayed in Clariti Core (capitalization, etc.) this will not be successful.
- Select Add Restrictive Purchased Product.
- If successful the product will disply in the list of Purchased Prodcucts (Licensing > Clariti > Purchased Products).
- Next to manage Entitlements. See Manage your Entitlements below.
- Next to Purchased Products. See Purchased Products below.
Manage your Entitlements
Here you will manage how entitlements are shared amongst your purchased products.
- In Poly Lens go to Licensing > Clariti > Entitlements.
- Select an Entitlement and select Assign.
- Locate the Purchased Product from the list.
- In the associated Update Attribute Count field, enter a number to assign.
- Select Assign Entitlements.
- Select additional Entitlements to assign in the same manner.
- Next to Purchased Products. See Purchased Products below.
Purchased Products
Here you will manage purchased products, this includes adding a new product, license management, or removing a product.
- In Poly Lens go to Licensing > Clariti > Purchased Products.
- Select the Purchased Product (Clariti Core) that we are working on and select License > Process License Request.
- Paste in the same Encoded License Request (as earlier) and select Process License Request.
- When it is successful, the field content changes and is now the Response to copy back to Clariti Core. Copy the field top the clipboard.
- Back to the Clariti Core System Web Interface. Select Admin > Server > Licenses.
- Select Install License and paste the copied text in the clipboard into the field.
- Select OK.
Access Tokens
The Access Token is an encrypted user name and password, that allows access into Poly Lens. This token must be entered into the Clariti Core System Web Interface to allow the connection.
- In Poly Lens, go to Manage > Licensing > Clariti > Access Tokens.
- Copy an Access Token from the list (with the copy to clipboard icon).
- Open the Clariti Core System Web Interface.
- Select Admin > Server > Licenses.
- Paste the Access Token copied from Poly Lens into the Clariti Access token field.
- Select Update.