Provisioning USB Video Devices
The following onboarding options into Poly Lens are focused on the Poly USB Video devices.
Onboard a Poly Studio USB Video Device using Provisioning
To onboard (register) a Poly Studio USB device into Poly Lens, you will use the Polycom Companion application.
- You must be logged into Poly Lens, and have created an account.
- Device Provisioning must be enabled on the account. See Device Provisioning on an Account.
- On the Device Provisioning page, select the copy icon, located after the Provisioning Server Address, this will copy the address to the clipboard.
- Open the Polycom Companion application while the Poly Studio USB device is connected to your PC.
- Select Admin Settings.
- Log into the application.
- Select Wi-Fi Settings.
- Set up the Provisioning Server.
Select Admin Settings > Provisioning Server. - Set the Provisioning Mode to Manual.
- Set the Server Type to Polycom Provisioning Service.
- Paste the copied Provisioning Server Address from Poly Lens into the Server Address field.
Note: Remove the https:// from the address. - Enter the Server User in the Username field, and Password that you entered in step 3 above.
Note: If you have forgotten the Server Password, click the view icon next to the password on the Device Provisioning page in Lens, the password will be displayed and copied to the clipboard for your convenience. - Click Save.

- Verify the device is in Poly Lens.
Onboard a Poly EagleEye Cube Device using Provisioning
To onboard (register) a Poly EagleEye Cube device into Poly Lens, you will use the Polycom Companion application.
- You must be logged into Poly Lens, and have created an account.
- Device Provisioning must be enabled on the account. See Device Provisioning on an Account.
- On the Device Provisioning page, select the copy icon, located after the Provisioning Server Address, this will copy the address to the clipboard.
- Open the Polycom Companion application while the Poly EagleEye Cube device is connected to your PC.
- Select Admin Settings.
- Log into the application.
- Select Network Settings.
- In the Network Mode field, select Ethernet from the drop-down list.
Once connected the Status field should display Connected, and the IP address of the device. - Set up the Provisioning Server.
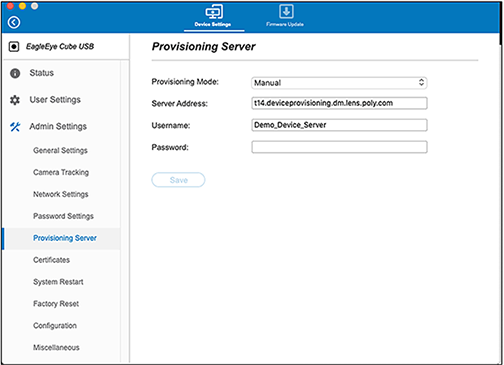
Select Admin Settings > Provisioning Server. - Set the Provisioning Mode to Manual.
- Paste the copied Provisioning Server Address from Poly Lens into the Server Address field.
Note: Remove the https:// from the address. - Enter the Server User in the Username field, and Password that you entered in step 3 above.
Note: If you have forgotten the Server Password, click the view icon next to the password on the Device Provisioning page in Lens, the password will be displayed and copied to the clipboard for your convenience. - Click Save.
- Verify the device is in Poly Lens.
Initial Parameters that are being Set by the Provisioning Service
The following parameters are set by the provisioning service.
| Friendly Name | Settings Name | Value |
|---|---|---|
| Provisioning Heartbeat Notification Interval (Seconds) | prov.heartbeat.interval | 600 |
| Update Interval (Seconds) | prov.polling.period | 86400 |
| Enable Automatic Updates | upgrade.auto.enable | 1 |